Options Pattern in Asp Net Core: Easier than you think!
Asp Net Core 中的选项模式:比你想象的更简单

照片由 西格蒙德 on Unsplash
照片由 Sigmund 在 Unsplash 上拍摄
I don’t think I need to mention that the Options Pattern has become the source of truth when it comes to distributing configurations across the system.
While it may seem overcomplicated and overwhelming at first glance, it is still very useful
我认为我不需要提到,当涉及到在整个系统中分配配置时,选项模式已成为事实的来源。虽然乍一看它可能看起来过于复杂和压倒性,但它仍然非常有用
我想不用我多说,"选项模式 "已成为在整个系统中分发配置的真理之源。 虽然乍一看可能过于复杂,令人不知所措,但它仍然非常有用
The very thing I’m going to mention in this story can be found in the original documentation, but I’ll present it in a more human-readable way:
我在这个故事中要提到的内容可以在原始文档中找到,但我将以一种更易于人类阅读的方式呈现它:
我在这篇报道中要提到的内容可以在原始文档中找到,但我会用更人性化的方式来表述:
When I consider options as configurations, for me, it naturally implies having the capability to establish, validate, and utilize them. Just like when we talk about your smartphone configurations; you can configure the volume, and during the configuration, it can be validated (for example, if you’ve restricted the maximum volume while using earbuds, it may not allow you to increase it further). Then these configurations are applied to the system, effectively increasing the sound volume.
So let’s go through each of these steps.
当我将选项视为配置时,对我来说,它自然意味着具有建立、验证和利用它们的能力。就像我们谈论您的智能手机配置一样;您可以配置音量,并在配置过程中对其进行验证(例如,如果您在使用耳塞时限制了最大音量,则可能不允许您进一步增加音量)。然后将这些配置应用于系统,从而有效地增加音量。因此,让我们完成这些步骤中的每一个。
当我把选项视为配置时,对我来说,它自然意味着拥有建立、验证和使用它们的能力。就像我们谈论智能手机的配置一样,你可以对音量进行配置,在配置过程中还可以对其进行验证(例如,如果你在使用耳塞时限制了最大音量,那么它可能不允许你进一步提高音量)。然后,这些配置就会应用到系统中,从而有效提高音量。
下面让我们逐一介绍这些步骤。
Establish / Set up / Configure
建立/设置/配置
Primarily out of the box, there are a few ways you can configure your options. However, regardless of the mechanism you choose, they all rely on the same underlying mechanism — the IConfigureOptions<TOptions> interface (in fact, there are more composite interfaces, but not all at once). So, as I’ve mentioned, despite of which mechanism is chosen, they register an IConfigureOptions<TOptions> implementation in one way or another. The framework allows you to utilize as many of these implementations as you want, and each of them will be involved in composition in the order of registration (although I wouldn’t recommend relying on that).
The Options can be added in two different at first glance but actually similar ways, direct Configuration method on IServiceCollection and via OptionsBuilder:
主要是开箱即用,您可以通过几种方式配置选项。但是,无论选择哪种机制,它们都依赖于相同的底层机制 — IConfigureOptions<TOptions> 接口(事实上,有更多的复合接口,但不是一次全部)。因此,正如我所提到的,无论选择哪种机制,它们都会以一种或另一种方式注册 IConfigureOptions<TOptions> 实现。该框架允许您根据需要使用任意数量的这些实现,并且每个实现都将按照注册顺序参与组合(尽管我不建议依赖它)。乍一看,可以通过两种不同但实际上相似的方式添加选项,即 IServiceCollection 上的直接配置方法和通过 OptionsBuilder:
开箱即用的选项配置方法主要有以下几种。但是,无论您选择哪种机制,它们都依赖于相同的底层机制--IConfigureOptions
builder.Services.AddOptions<TOptions>() // creates a OptionsBUilder
    .Configure(options =>
    {
        //options configuration here
    });
builder.Services.Configure<TOptions>(options =>
{
    //options configuration here
});
They both register the exact class — ConfigureNamedOptions<TOptions> as an implementation of IConfigureOptions<TOptions>. (Please, neglect the ‘Named’, we will examine it later).
它们都注册了确切的类 — ConfigureNamedOptions<TOptions> 作为 IConfigureOptions 的实现<TOptions>。(请忽略“命名”,我们稍后会检查它)。
它们都注册了一个完全相同的类 ConfigureNamedOptions
In the example before, the configurations assume that you set them up manually, for example, by using “options.SomeProperty = someValue.” However, it is also possible to bind options to the built-in ‘IConfiguration’ feature of ASP (actually, it is part of Microsoft.Extensions.Configuration and can be utilized independently from ASP; but never mind):
在前面的示例中,配置假定您手动设置它们,例如,使用“options.SomeProperty = someValue。但是,也可以将选项绑定到 ASP 的内置“IConfiguration”功能(实际上,它是 Microsoft.Extensions.Configuration 的一部分,可以独立于 ASP 使用;但没关系):
在前面的示例中,配置假定是手动设置的,例如使用 "options.SomeProperty = someValue"。不过,也可以将选项绑定到 ASP 的内置 "IConfiguration "功能上(实际上,它是 Microsoft.Extensions.Configuration 的一部分,可以独立于 ASP 使用;但不要紧):
builder.cServices.Configure<TOptions>(
    builder.Configuration.GetSection("Configuration Section Name"));
//or
builder.Services.AddOptions<TOptions>()
    .Bind(builder.Configuration.GetSection("Configuration Section Name"));
//in example upper it uses the direct desirialization from json config
//but it can be achieved also as:
class Opt{
 [ConfigurationKeyName("TestSection:TestPropery")]
  public string Property { get; set; }
}
builder.Services.AddOptions<Opt>(Builder.Configuration);
I hope that this has given you some ideas about configuration. I’m going to move forward with our topic and discuss the consumption of our configured options. However, I’ll also introduce a few more ideas related to configurations later on.
我希望这能给你一些关于配置的想法。我将继续讨论我们的主题,并讨论我们配置的选项的使用。但是,我稍后还将介绍一些与配置相关的更多想法。
我希望这能给你带来一些关于配置的想法。接下来,我将继续我们的话题,讨论如何使用我们的配置选项。不过,稍后我还会介绍一些与配置相关的想法。
Utilizing
利用 利用利用
More interesting aspects come into play when you start utilizing the Options you’ve configured. Options can be consumed through three interfaces:
当您开始使用已配置的选项时,更多有趣的方面就会发挥作用。可以通过三个界面使用选项:
当你开始使用配置的选项时,更有趣的方面就会出现。可通过三个界面使用选项:
IOptions<TOptions>
IOptionsSnapshot<TOptions>
IOptionsMonitor<TOptions>
According to the official documentation:
根据官方文件:
根据官方文件:
IOptions<TOptions>:
  * Does not support:
    * Reading of configuration data after the app has started.
    * Named options
  * Is registered as a Singleton and can be injected into any service lifetime.

IOptionsSnapshot<TOptions>:
  * Supports named options
  * Is useful in scenarios where options should be recomputed on every
    injection resolution, in scoped or transient lifetimes.
  * Is registered as Scoped and therefore cannot be injected into a
    Singleton service.

IOptionsMonitor<TOptions>:
  * Supports:
    * Change notifications
    * Named options
    * Reloadable configuration
    * Selective options invalidation (IOptionsMonitorCache<TOptions>)
  * Is used to retrieve options and manage options notifications
    for TOptions instances.
  * Is registered as a Singleton and can be injected into any service lifetime.
But honestly, for me, it makes things unclear, so my main intention is to bring clarity to these interfaces. For that purpose, I’ll need a small code demo. In a plain ASP.NET Core Web API project, let’s add a TestOptions class:
但老实说,对我来说,这让事情变得不清楚,所以我的主要目的是让这些界面变得清晰。为此,我需要一个小代码演示。在普通 ASP.NET 核心 Web API 项目中,让我们添加一个 TestOptions 类:
但老实说,对我来说,这让事情变得不清晰,所以我的主要意图是让这些界面变得清晰。为此,我需要一个小的代码演示。在一个普通的 ASP.NET Core Web API 项目中,让我们添加一个 TestOptions 类:
    public class TestOptions
    {
        public static string SectionName = "Test";
        public string Property1 { get; set; }
        public string Property2 { get; set; }
        public string Property3 { get; set; }
        public string AppendingProperty { get; set; }
    }
And set up our Options in the Program.cs:
并在Program.cs中设置我们的选项:
然后在 Program.cs 中设置我们的选项:
var builder = WebApplication.CreateBuilder(args);
builder.Services.AddControllers();
builder.Services.AddOptions<TestOptions>()
.Bind(builder.Configuration.GetSection(TestOptions.SectionName));
builder.Services.Configure<TestOptions>(options =>
{
//ussed to show that the configuration is applied in order of registration
options.AppendingProperty += "[after_binding]";
});
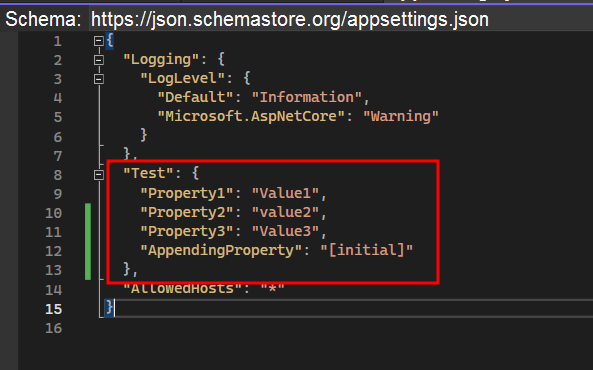
...and the following to appsettings.json:
以及以下appsettings.json:
并在 appsettings.json 中添加以下内容:
And TestController class:
和 TestController 类:
和 TestController 类:
[Route("api/[controller]")]
    [ApiController]
    public class TestController : ControllerBase
    {
        private readonly IOptionsSnapshot<TestOptions> _testOptionsSnapshot;
        private readonly IOptions<TestOptions> _testOptions;
        private readonly IOptionsMonitor<TestOptions> _optionsMonitor;

        public TestController(
            IOptionsSnapshot<TestOptions> testOptionsSnapshot,
            IOptions<TestOptions> testOptions,
            IOptionsMonitor<TestOptions> optionsMonitor)
        {
            _testOptionsSnapshot = testOptionsSnapshot;
            _testOptions = testOptions;
            _optionsMonitor = optionsMonitor;
        }

        [HttpGet("nowait")]
        public async Task<IActionResult> InvokeWithouWait()
        {
            var result = new
            {
                Options = _testOptions.Value,
                OptionsSnapshot = _testOptionsSnapshot.Value,
                OptionsMonitor = _optionsMonitor.CurrentValue
            };
            return Ok(
                result
                );
        }

        [HttpGet("wait")]
        public async Task<IActionResult> IndexAsync()
        {
            var beforeChange = new
            {
                Options = _testOptions.Value,
                OptionsSnapshot = _testOptionsSnapshot.Value,
                OptionsMonitor = _optionsMonitor.CurrentValue
            };

            //code to waite for 1 minte
            //change the value of appsettings.json file in this time
            await Task.Delay(20000);

            var afterChange = new
            {
                Options = _testOptions.Value,
                OptionsSnapshot = _testOptionsSnapshot.Value,
                OptionsMonitor = _optionsMonitor.CurrentValue
            };

            var result = new { beforeChange, afterChange };
            return Ok(
                result
                );
        }
    }
As you can see from the code above, we are defining the endpoint /api/test/wait, which retrieves configuration from every registered interface twice. This delay is needed to allow enough time to edit and save appsettings.json while making the request (to show you the difference).:
从上面的代码中可以看出,我们正在定义端点 /api/test/wait,它从每个注册的接口检索配置两次。需要此延迟,以便在发出请求时留出足够的时间来编辑和保存appsettings.json(以显示差异)。
从上面的代码中可以看到,我们定义的端点 /api/test/wait,会从每个注册接口检索两次配置。这种延迟是为了在请求时有足够的时间编辑和保存 appsettings.json(向您展示差异):
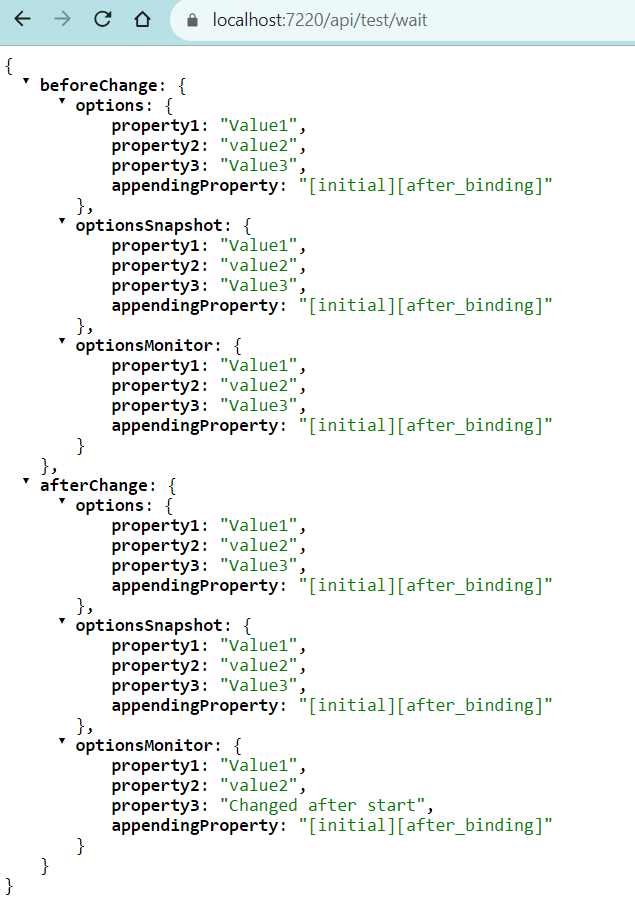
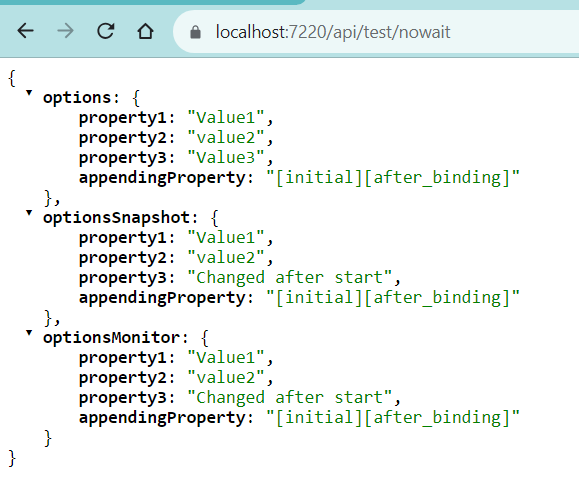
I changed Property3 during this waiting period, and as you can see, only the IOptionsMonitor reacted to the changes. If we make a request again to /api/test/nowait, these changes will also be reflected in IOptionsSnapshot but not in the IOptions.
在此等待期间,我更改了 Property3,如您所见,只有 IOptionsMonitor 对更改做出了反应。如果我们再次向 /api/test/nowait 发出请求,这些更改也将反映在 IOptionsSnapshot 中,但不会反映在 IOptions 中。
在等待期间,我更改了 Property3,如您所见,只有 IOptionsMonitor 对更改做出了反应。如果我们再次向 /api/test/nowait 发出请求,这些更改也会反映在 IOptionsSnapshot 中,但不会反映在 IOptions 中。
While everything is very clear with IOptions — it never changes since the first utilization, the other two require a few more words:
虽然 IOptions 的一切都非常清楚——自第一次使用以来它从未改变过,但其他两个还需要多说几句话:
IOptions 的一切都非常清楚--自首次使用以来从未改变过,而其他两个则需要多说几句:
This works that way because IOptionsSnapshot composes the options object in each request upon first retrieval (I don’t recommend using this as it’s a performance-intensive feature unless you really need to reconstruct options and preserve their integrity per request). On the other hand, IOptionsMonitor reacts to changes in bound sources and removes only the changed objects from the cache (unfortunately, we won’t cover it here as it’s another extensive topic for discussion).
这是工作方式,因为 IOptionsSnapshot 在第一次检索时会组合每个请求中的选项对象(我不建议使用它,因为它是一项性能密集型功能,除非您确实需要重构选项并保留每个请求的完整性)。另一方面,IOptionsMonitor 对绑定源中的更改做出反应,并仅从缓存中删除已更改的对象(不幸的是,我们不会在这里介绍它,因为这是另一个需要讨论的广泛主题)。
之所以如此,是因为 IOptionsSnapshot 会在首次检索时在每个请求中编译选项对象(我不建议使用该功能,因为它是一个性能密集型功能,除非你真的需要重建选项并保持每个请求的完整性)。另一方面,IOptionsMonitor 会对绑定源中的更改做出反应,并只从缓存中删除已更改的对象(遗憾的是,我们不会在这里介绍它,因为这是另一个需要讨论的广泛话题)。
I hope this gives you an idea of how these interfaces differ and how they behave
我希望这能让您了解这些接口的不同之处以及它们的行为方式
希望这能让您了解这些接口的不同之处和它们的行为方式
IPostConfigureOptions
IP PostConfigureOptions
Apart from the IConfigureOptions, IPostConfigureOptions<TOptions> can be used to apply additional configuration. IPostConfigureOptions take place after all registered IConfigureOptions implementations have been executed on an options object during the composing process. (While you still can register more than one IPostConfigureOptions implementation, they are executed in the same - registered order).
除了 IConfigureOptions 之外,IPostConfigureOptions<TOptions> 还可用于应用其他配置。IPostConfigureOptions 在编写过程中对选项对象执行完所有已注册的 IConfigureOptions 实现后发生。(虽然您仍然可以注册多个 IPostConfigureOptions 实现,但它们以相同的 - 注册顺序执行)。
除 IConfigureOptions 外,IPostConfigureOptions
Why do we need IPostConfigureOptions if we can register as many IConfigureOptions? They operate with values that have already been set, as you can see in the above responses. AppendingProperty was initially set by Bin(…) and then modified with the next registered IConfigureOptions, as we wrote it:
如果我们可以注册尽可能多的 IConfigureOptions,为什么还需要 IPostConfigureOptions 呢?正如您在上面的回复中看到的,它们对已设置的值进行操作。AppendingProperty 最初由 Bin(...) 设置,然后用下一个注册的 IConfigureOptions 进行修改,正如我们所写的那样:
builder.Services.AddOptions<TestOptions>()
    .Bind(builder.Configuration.GetSection(TestOptions.SectionName));
builder.Services.Configure<TestOptions>(options =>
{
    //ussed to show that the configuration is applied in order of registration
    options.AppendingProperty += "[after_binding]";
});
The answer is simple: we may want to give third parties a chance to make configurations on their own, but we still need a few steps at the end of the configuration process. For example, the AddJwt authentication scheme works in a way that allows you to configure everything on your own. However, in case you haven’t registered JWKs but have registered the authority URL, it reads them from there.
So even if we add PostConfigure in the middle of the configuration:
答案很简单:我们可能希望让第三方有机会自行进行配置,但我们仍然需要在配置过程的最后设置几个步骤。例如,AddJwt 身份验证方案的工作方式允许您自行配置一切。不过,如果您没有注册 JWK,但注册了授权 URL,它就会从那里读取它们。 因此,即使我们在配置中间添加了 PostConfigure,也是如此:
builder.Services.AddOptions<TestOptions>()
    .Bind(builder.Configuration.GetSection(TestOptions.SectionName));
builder.Services.PostConfigure<TestOptions>(options =>
{
    options.AppendingProperty += "[in_post_configure]";
});
builder.Services.Configure<TestOptions>(options =>
{
    //ussed to show that the configuration is applied in order of registration
    options.AppendingProperty += "[after_binding]";
});
We will still get it in the predictable order:
我们还是会按照可预测的顺序来做:

Named Options
命名选项
You’ve already seen this mentioned throughout the article a few times, so let’s figure out how it works and why we need it.
But first, recall that the Named Options Feature is supported only by either IOptionsSnapshot or IOptionsMonitor.
So, what do they allow us to have?
我们已经在文章中多次提到了这一点,下面就让我们来了解一下它是如何工作的,以及为什么我们需要它。
首先,请记住,只有 IOptionsSnapshot 或 IOptionsMonitor 才支持命名选项功能。
那么,它们能让我们拥有什么呢?
Let’s create a new class to demonstrate such options:
让我们创建一个新类来演示这些选项:
public class TestNamedOptions
{
    public string Property { get; set; }
    public string PropertyToDemoAll { get; set; }
}
Set up it in the Program.cs:
在 Program.cs 中进行设置:
builder.Services.ConfigureAll<TestNamedOptions>(options =>
{
    options.PropertyToDemoAll = "Configured in ConfigureAll";
});
builder.Services.AddOptions<TestNamedOptions>("Name1")
    .Configure(options =>
    {
        options.Property = "Name1 otpions property";
    });
builder.Services.AddOptions<TestNamedOptions>("Name2")
     .Configure(options =>
     {
         options.Property = "Name2 otpions property";
     });
Inject IOptionsMonitor<TestNamedOptions> namedOptionsMonitor to the TestController and add a new action to it:
向 TestController 注入 IOptionsMonitor
[HttpGet("named")]
public async Task<IActionResult> GetNamedOptions()
{
    var result = new
    {
        Name1 = _namedOptionsMonitor.Get("Name1"),
        Name2 = _namedOptionsMonitor.Get("Name2")
    };
    return Ok(result);
}
And nothing explains it better as a demo:
没有什么比演示更能说明问题了:

As you can see, the named options feature allows us to register the same options type multiple times, configure them differently (and even share configuration among all via ConfigureAll, as you may observe from propertyToDemoAll), and then you can easily retrieve the needed configuration by name. This feature is widely used throughout the ASP framework, for example in Authentication, where you register the scheme and its configuration, with the scheme name actually being the name of the options object.
正如您所看到的,命名选项功能允许我们多次注册相同的选项类型,并对它们进行不同的配置(甚至可以通过 ConfigureAll 在所有选项之间共享配置,您可以从 propertyToDemoAll 中观察到这一点),然后您可以轻松地通过名称检索所需的配置。这一功能在整个 ASP 框架中得到了广泛应用,例如在身份验证中,您可以注册方案及其配置,而方案名称实际上就是选项对象的名称。
To bring things back to reality, you need to be aware of IConfigureNamedOptions<TOptions>, which is used whenever you call default configuration mechanisms. Even if you don’t specify the name directly, it is registered with Options.DefaultName (which is actually an empty string). However, it inherits from IConfigureOptions<TOptions>, which is why I still consider IConfigureOptions as something that underlies it.
为了让事情回到现实,您需要了解 IConfigureNamedOptions
I think it’s important to understand how options are constructed, and here is the code from the fabric class that composes an options object:
我认为了解选项是如何构成的很重要,下面是织物类中构成选项对象的代码:
...
foreach (IConfigureOptions<TOptions> setup in _setups)
{
    if (setup is IConfigureNamedOptions<TOptions> namedSetup)
    {
        namedSetup.Configure(name, options);
    }
    else if (name == Options.DefaultName)
    {
        setup.Configure(options);
    }
}
foreach (IPostConfigureOptions<TOptions> post in _postConfigures)
{
    post.PostConfigure(name, options);
}
...
Where _setups is retrieved directly via injection all registered IConfigureOptions from DI:
其中 _setups 通过注入 DI 中所有已注册的 IConfigureOptions 直接获取:
public OptionsFactory(
  IEnumerable<IConfigureOptions<TOptions>> setups,
  IEnumerable<IPostConfigureOptions<TOptions>> postConfigures,
  IEnumerable<IValidateOptions<TOptions>> validations
)...
So now I hope it makes more sense to you how the options are registered, configured, and constructed.
现在,我希望你能明白选项是如何注册、配置和构建的。
Validation
验证
The final point of our journey — validation.
Validators are executed right after the creation of options, actually within the same function. You’ve already seen this code, but here’s the full version:
我们旅程的最后一点--验证。 验证器在创建选项后立即执行,实际上是在同一个函数中执行。你已经看过这段代码,下面是完整版:
public TOptions Create(string name)
{
    TOptions options = CreateInstance(name);
    foreach (IConfigureOptions<TOptions> setup in _setups)
    {
        if (setup is IConfigureNamedOptions<TOptions> namedSetup)
        {
            namedSetup.Configure(name, options);
        }
        else if (name == Options.DefaultName)
        {
            setup.Configure(options);
        }
    }
    foreach (IPostConfigureOptions<TOptions> post in _postConfigures)
    {
        post.PostConfigure(name, options);
    }

    if (_validations != null)
    {
        var failures = new List<string>();
        foreach (IValidateOptions<TOptions> validate in _validations)
        {
            ValidateOptionsResult result = validate.Validate(name, options);
            if (result is not null && result.Failed)
            {
                failures.AddRange(result.Failures);
            }
        }
        if (failures.Count > 0)
        {
            throw new OptionsValidationException(name, typeof(TOptions), failures);
        }
    }

    return options;
}
Validation can be provided via 3 main places:
DataAnataion
Validation Predicate
External Validator
可通过 3 个主要途径提供验证: DataAnataion 验证谓词 外部验证器
To demonstrate it we need options class and external validator:
为了演示它,我们需要选项类和外部验证器:
public class TestValidationOptions
{
    [Required]
    public string DataAnatationProperty { get; set; }
    public string ValidationPredicateProperty { get; set; }
    public string ExternalValidatorProperty { get; set; }
}

public class TestValidationOptionsValidator : IValidateOptions<TestValidationOptions>
{
    public ValidateOptionsResult Validate(string name, TestValidationOptions options)
    {
        if (options.ExternalValidatorProperty == null)
        {
            return ValidateOptionsResult.Fail("ExternalValidatorProperty is null");
        }
        return ValidateOptionsResult.Success;
    }
}
As you can see, DataAnnotationProperty has the [Required] attribute from System.ComponentModel.DataAnnotations. The external validator also validates as required by comparing with null.
Then we need to add these options to the Program.cs:
如您所见,DataAnnotationProperty 具有来自 System.ComponentModel.DataAnnotations 的 [Required] 属性。外部验证器也会通过与 null 比较来验证是否符合要求。
然后,我们需要将这些选项添加到 Program.cs 中:
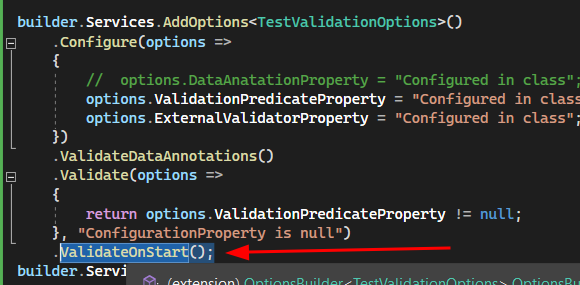
builder.Services.AddOptions<TestValidationOptions>()
    .Configure(options =>
    {
        options.DataAnatationProperty = "Configured in class";
        options.ValidationPredicateProperty = "Configured in class";
        options.ExternalValidatorProperty = "Configured in class";
    })
    .ValidateDataAnnotations()
    .Validate(options =>
    {
        return options.ValidationPredicateProperty != null;
    }, "ConfigurationProperty is null");
builder.Services.AddSingleton<IValidateOptions<TestValidationOptions>, TestValidationOptionsValidator>();
Similarly, for the external validator, we compare it with null.
So now, if we add the following action to the TestController and inject IOptionsMonitor<TestValidationOptions>:
同样,对于外部验证器,我们将其与 null 进行比较。
现在,如果我们在 TestController 中添加以下操作,并注入 IOptionsMonitor
        [HttpGet("validation")]
        public async Task<IActionResult> GetValidationOptions()
        {
            var result = _validationOptionsMonitor.CurrentValue;
            return Ok(result);
        }
We will see that all is fine:
我们会看到一切正常:

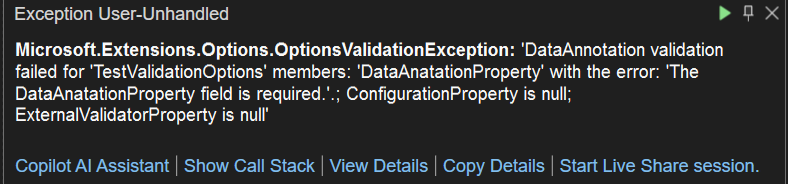
But if, for example, we comment out the setup of the DataAnnotationProperty, we will encounter an error when trying to access /api/test/validation:
但是,举例来说,如果我们注释掉 DataAnnotationProperty 的设置,在尝试访问 /api/test/validation 时就会遇到错误:

But we also can add ValidateOnStart() to immediately break the application while attending to run with incorrect configuration:
不过,我们也可以添加 ValidateOnStart() 来立即中断应用程序的运行,同时避免在配置不正确的情况下运行:
And now you won’t be able to proceed until all validations are passed.
现在,在所有验证都通过之前,您将无法继续。
DI during Options Creation
选项创建过程中的 DI
There are two primary ways to inject services into the Configurator or Validator: either register them as a separate class and use constructor injection, or use a specific method of OptionsBuilder that allows you to specify services, like:
向配置器或校验器注入服务有两种主要方式:要么将服务注册为单独的类并使用构造函数注入,要么使用 OptionsBuilder 的特定方法来指定服务,例如
.Configure<IMyService1, IMyService2>((options, myService1, myService2) =>..);And that’s a wrap!
到此为止!
The code can be found here.
代码可在此处找到。
I hope that this article was not only informative but also provided you with a clear understanding of the intricacies of the Options Pattern.
我希望这篇文章不仅能为你提供信息,还能让你清楚地了解期权模式的复杂性。
Also, if you enjoyed this story and found it insightful, be sure to follow me for more engaging content like this in the future.
You can also follow me on LinkedIn where I post notifications about my new publication with free access links.
此外,如果您喜欢这个故事并认为它很有见地,请务必关注我,以便今后获得更多类似的精彩内容。 您还可以在 LinkedIn 上关注我,我将在那里发布有关我新出版物的通知,并提供免费链接。
In addition, if you build multitenant applications you may find this helpful: Tenanted Options for Multitenant Applications in ASP
此外,如果您构建了多租户应用程序,您可能会发现这对您很有帮助:ASP 中多租户应用程序的租户选项


