Adding .NET Aspire to your existing .NET apps
将 .NET Aspire 添加到现有的 .NET 应用
.NET Aspire is a new cloud-ready stack tailored for .NET, enabling developers to quickly and easily develop distributed applications. You’ve probably seen demos showing large .NET solutions with lots of fancy cloud dependencies and thought, well, maybe I’d use that someday if I’m starting on a giant enterprise Redis Kafka Postgres cloud-a-ganza, but it’s not really something I can use today.
.NET Aspire 是为 .NET 量身定制的新的云就绪堆栈,使开发人员能够快速轻松地开发分布式应用程序。您可能已经看过演示,这些演示展示了具有许多花哨的云依赖项的大型 .NET 解决方案,并想,好吧,如果我开始开发大型企业 Redis Kafka Postgres cloud-a-ganza,也许有一天我会使用它,但这不是我今天可以使用的东西。
But .NET Aspire is not just about cutting-edge technology and green-field apps; it’s also about making your current applications more straightforward. With .NET Aspire, you can streamline the startup process, improve monitoring, and increase the reliability of your applications. Plus, you can use service discovery to enhance your apps, even if you’re not ready to use more complex features or services like Redis or containerized deployment.
但是,.NET Aspire 不仅与尖端技术和绿地应用有关;这也是为了使您当前的应用程序更加简单明了。使用 .NET Aspire,您可以简化启动过程、改进监视并提高应用程序的可靠性。此外,即使您尚未准备好使用更复杂的功能或服务(如 Redis 或容器化部署),也可以使用服务发现来增强您的应用程序。
In this post, we’ll look at how easy it is to make your existing solutions better – just easier to maintain and add the kind of features you’re already working on. And, sure, it’s nice that you can more easily integrate more sophisticated cloud dependencies and features… but even if you never do it’s still a win.
在这篇文章中,我们将看看使您现有的解决方案变得更好是多么容易 - 只是更容易维护和添加您已经在使用的功能类型。而且,当然,您可以更轻松地集成更复杂的云依赖项和功能,这很好......但即使你从不这样做,它仍然是一种胜利。
TLDR: In under 5 minutes you can add .NET Aspire to your existing apps and get a dashboard, health checks, and more… all without changing how your apps work, your CI/CD pipeline, or deployment process.
TLDR:在不到 5 分钟的时间内,您可以将 .NET Aspire 添加到现有应用程序中,并获得仪表板、运行状况检查等......所有这些都不会改变应用的工作方式、CI/CD 管道或部署过程。
What even is .NET Aspire?
什么是 .NET Aspire?
If you ask five people, you will most likely get five different answers. Honestly, it’s a little hard to describe, and attempts to do it briefly can turn into a bit of buzzword bingo. Really, it’s just a way to solve a problem: building distributed applications is hard. Even just running your app requires starting up one or more services and a front-end and making sure they can talk to each other can be frustrating. Wouldn’t it be nice if that was easier? That is what .NET Aspire aims to do, be your building blocks for your distributed applications making them more observable, resilient, scalable, and manageable.
如果你问五个人,你很可能会得到五个不同的答案。老实说,这有点难以描述,尝试简短地做到这一点可能会变成一些流行语宾果游戏。实际上,这只是解决问题的一种方式:构建分布式应用程序很困难。即使只是运行您的应用程序也需要启动一个或多个服务和前端,并确保它们可以相互通信可能会令人沮丧。如果这更容易,那不是很好吗?这就是 .NET Aspire 的目标,成为分布式应用程序的构建块,使它们更具可观察性、弹性、可伸缩性和可管理性。
Let’s take a look at how a lot of applications evolve over time. A lot start as a single monolithic proof of concept. You’ve got an app with a database.
让我们看一下许多应用程序是如何随着时间的推移而演变的。很多都是从单一的整体概念验证开始的。你有一个带有数据库的应用程序。
Assuming your proof of concept is successful, just about every modern app evolves to include at least a front and back-end, in addition to the database.
假设您的概念验证成功,那么除了数据库之外,几乎每个现代应用程序都会发展到至少包括前端和后端。
And then, maybe, if our app’s usage and functionality keeps growing over time, the app will become really distributed, relying on a large set of distributed dependencies.
然后,也许,如果我们的应用程序的使用和功能随着时间的推移而不断增长,那么应用程序将变得真正分布式,依赖于大量的分布式依赖项。
But here’s the important thing! Even in the really simple Proof Of Concept phase, and definitely in the Frontend-Backend-Database phase, we can benefit from .NET Aspire! With just a few lines of code, and without messing with our CI or deployment, we can really simplify our day-to-day developer experience.
但重要的是!即使在非常简单的概念验证阶段,肯定在前端-后端-数据库阶段,我们也可以从 .NET Aspire 中受益!只需几行代码,而且不会干扰我们的 CI 或部署,我们就可以真正简化我们的日常开发人员体验。
Step 1: Turn on .NET features we’ve been too busy to turn on with ServiceDefaults
步骤 1:打开 .NET 功能 我们一直忙于使用 ServiceDefaults 启用
The ASP.NET Core team has been lighting up features for cool features for things like tracing, health checks, and resiliency for years. I’ve done half a dozen conference talks on “The One Hour ASP.NET Makeover” where we just turn on and configure all these cool features that have been in the box for years. But here’s the thing… it takes an hour to do that talk, after reading the docs and practicing! What if I could just flip an “Enable Pro Mode” switch instead?
多年来,ASP.NET Core 团队一直在为跟踪、运行状况检查和弹性等功能提供酷炫的功能。我已经做了六次关于“一小时 ASP.NET 改造”的会议演讲,我们只是打开并配置所有这些已经开箱即用多年的酷炫功能。但事情是这样的......在阅读文档和练习之后,做这个演讲需要一个小时!如果我可以改为拨动“启用专业模式”开关会怎样?
That’s what Service Defaults does for you. You can just turn on Service Defaults and you’ve got smart logging, health checks, resiliency, etc. based on what the .NET team recommends for ASP.NET Core apps and services. If you want, you can easily edit the Program.cs file in the ServiceDefaults project, but you don’t have to. Just turn it on.
这就是 Service Defaults 为您所做的。只需打开“服务默认值”,即可根据 .NET 团队对 ASP.NET Core 应用和服务的建议,获得智能日志记录、运行状况检查、复原能力等。如果需要,您可以轻松地编辑 ServiceDefaults 项目中的 Program.cs 文件,但您不必这样做。只需打开它。
Adding a ServiceDefaults project
添加 ServiceDefaults 项目
Let’s look at an example with a simple Frontend – Backend app. I’ll use Jeff Fritz’s new MyWeatherHub sample from the Let’s Learn .NET Aspire event series, starting with the start-with-api code.
让我们看一个简单的前端 - 后端应用程序的示例。我将使用 Jeff Fritz 的 Let's Learn .NET Aspire 事件系列中的新 MyWeatherHub 示例,从 start-with-api 代码开始。
Opening the solution, we’ll see that we’ve got two projects:
打开解决方案,我们将看到我们有两个项目:
- MyWeatherHub – Web front-end project which displays live weather data
MyWeatherHub – 显示实时天气数据的 Web 前端项目 - API – Minimal API project which exposes live weather data from the US National Weather Service via a set of HTTP API endpoint
API – 最小的 API 项目,通过一组 HTTP API 端点公开来自美国国家气象局的实时天气数据
Let’s add Service Defaults to this solution so we get health checks, logging, and other recommended features to both our front and back ends.
让我们将 Service Defaults 添加到此解决方案中,以便我们在前端和后端都能获得运行状况检查、日志记录和其他推荐的功能。
In Visual Studio 2022 or Visual Studio Code with the C# Dev Kit installed, here’s all we need to do:
在安装了 C# 开发工具包的 Visual Studio 2022 或 Visual Studio Code 中,我们需要执行以下所有操作:
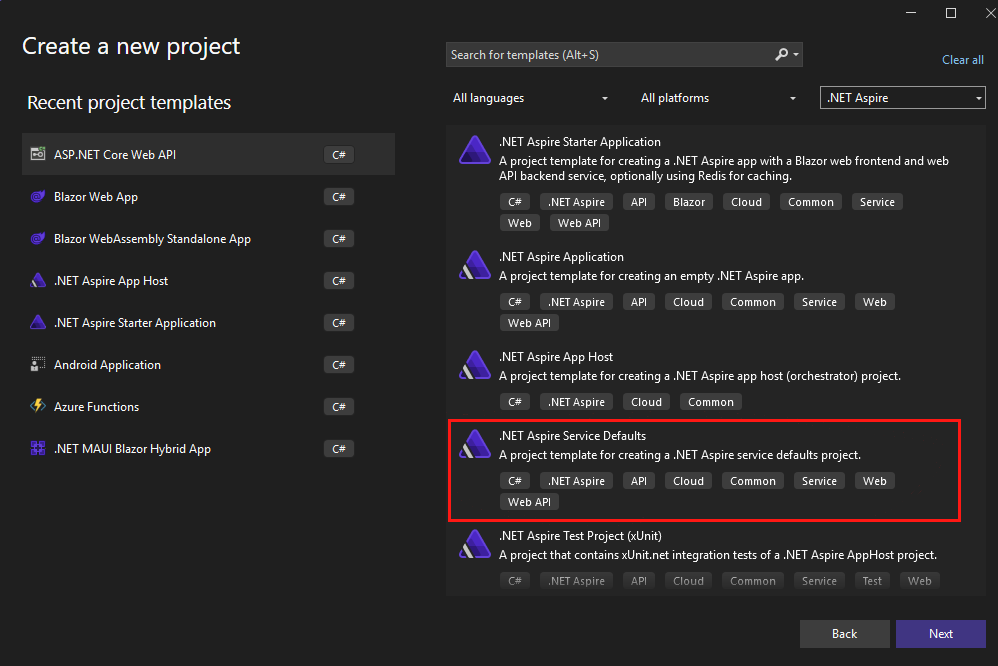
- Right-click on the solution and select Add > New Project.
右键单击解决方案,然后选择“添加>新项目”。 - Select the .NET Aspire Service Defaults project template.
选择“.NET Aspire Service Defaults”项目模板。 - Name the project ServiceDefaults (any name would work if you’re feeling creative, but the instructions in this post assume you’re using ServiceDefaults).
将项目命名为 ServiceDefaults(如果您觉得有创意,任何名称都可以使用,但本文中的说明假设您正在使用 ServiceDefaults)。 - Click Next > Create. 单击“下一步”>“创建”。
Here’s how that looks in Visual Studio 2022:
下面是 Visual Studio 2022 中的外观:
And in Visual Studio Code, it looks like this:
在 Visual Studio Code 中,它如下所示:
You can also add Service Defaults from the command line by using:
您还可以使用以下命令从命令行添加服务默认值:
dotnet new aspire-servicedefaults -n ServiceDefaultsAll the above options just drop a new project that knows the best settings for most ASP.NET Core distributed apps into your solution. However, none of your existing apps are using it yet. We’ll hook that up next.
上述所有选项只是将一个新项目拖放到您的解决方案中,该项目知道大多数 ASP.NET Core 分布式应用的最佳设置。但是,您现有的应用程序尚未使用它。我们接下来会把它连接起来。
Configure Service Defaults
配置服务默认值
Add a reference to the ServiceDefaults project in the Api and MyWeatherHub projects:
在 Api 和 MyWeatherHub 项目中添加对 ServiceDefaults 项目的引用:
- Right-click on the Api project and select Add > Reference.
右键单击 Api 项目,然后选择 Add > Reference。 - Check the ServiceDefaults project and click OK.
检查 ServiceDefaults 项目,然后单击 OK。 - Right-click on the MyWeatherHub project and select Add > Reference.
右键单击 MyWeatherHub 项目,然后选择“添加>引用”。 - Check the ServiceDefaults project and click OK.
检查 ServiceDefaults 项目,然后单击 OK。Visual Studio 2022 tip Visual Studio 2022 提示
In Visual Studio 2022, you can drag and drop the project onto another project to add a reference.
在 Visual Studio 2022 中,可以将项目拖放到另一个项目上以添加引用。 - In both the Api and MyWeatherHub projects, update their
Program.csfiles, adding the following line immediately after theirvar builder = WebApplication.CreateBuilder(args);line:
在 Api 和 MyWeatherHub 项目中,更新其Program.cs文件,并在其var builder = WebApplication.CreateBuilder(args);行后立即添加以下行:builder.AddServiceDefaults(); - In both the Api and MyWeatherHub projects, update their
Program.csfiles,adding the following line immediately after theirvar app = builder.Build();line:
在 Api 和 MyWeatherHub 项目中,更新其Program.cs文件,并在其var app = builder.Build();行后立即添加以下行:app.MapDefaultEndpoints();
Run the application 运行应用程序
To start with, we’re going to the application using a multiple-project launch configuration. This is fine, it’s how we’ve been doing things for years, but I have to admit I don’t really love it. Keep in mind that we’re going to make this easier in the next step. We’re doing this in two steps to make it clear what’s going on in Service Defaults and which parts are added by the AppHost.
首先,我们将使用多项目启动配置来访问应用程序。这很好,这就是我们多年来的做事方式,但我不得不承认我并不真正喜欢它。请记住,我们将在下一步中简化此操作。我们分两个步骤来完成此操作,以明确服务默认值中发生的事情以及 AppHost 添加了哪些部分。
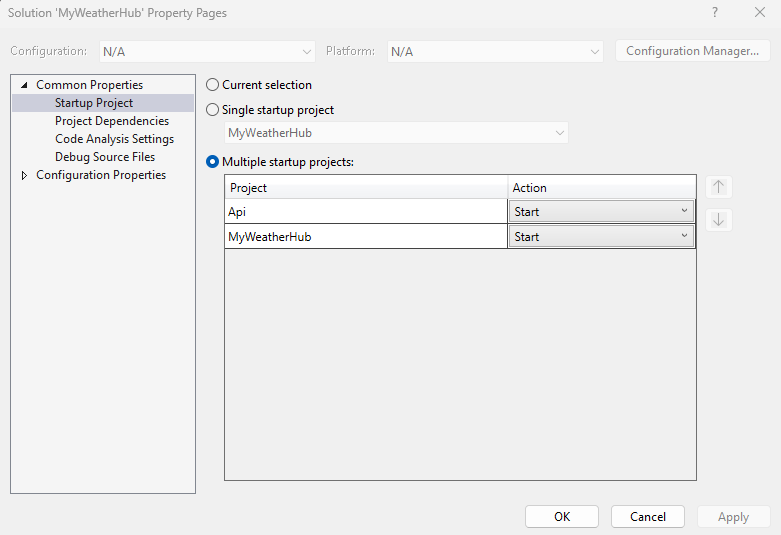
If you’re using Visual Studio 2022, right click on the MyWeatherHub solution and go to properties. Select the Api and MyWeatherHub as startup projects, select OK.
如果您使用的是 Visual Studio 2022,请右键单击 MyWeatherHub 解决方案,然后转到属性。选择 Api 和 MyWeatherHub 作为启动项目,然后选择“确定”。
Now click Start to start and debug both projects.
现在单击“开始”以启动并调试这两个项目。
If you’re using Visual Studio Code, run the Api and MyWeatherHub projects using the Run and Debug panel. The sample project already includes a launch.json file with the necessary configurations to run both.
如果您使用的是 Visual Studio Code,请使用“运行和调试”面板运行 Api 和 MyWeatherHub 项目。示例项目已包含一个 launch.json 文件,其中包含运行这两者所需的配置。
Test the Service Defaults changes
测试服务默认值更改
- Test the application by navigating to the following URLs:
通过导航到以下 URL 来测试应用程序:- https://localhost:7032/swagger/index.html – API
- https://localhost:7274/ – MyWeatherHub
- You should see the Swagger UI for the API and the MyWeatherHub home page.
您应该会看到 API 的 Swagger UI 和 MyWeatherHub 主页。 - You can also view the health checks for the API by navigating to https://localhost:7032/health.
您还可以通过导航到 https://localhost:7032/health 来查看 API 的运行状况检查。 - You can also view the health checks for the MyWeatherHub by navigating to https://localhost:7274/health.
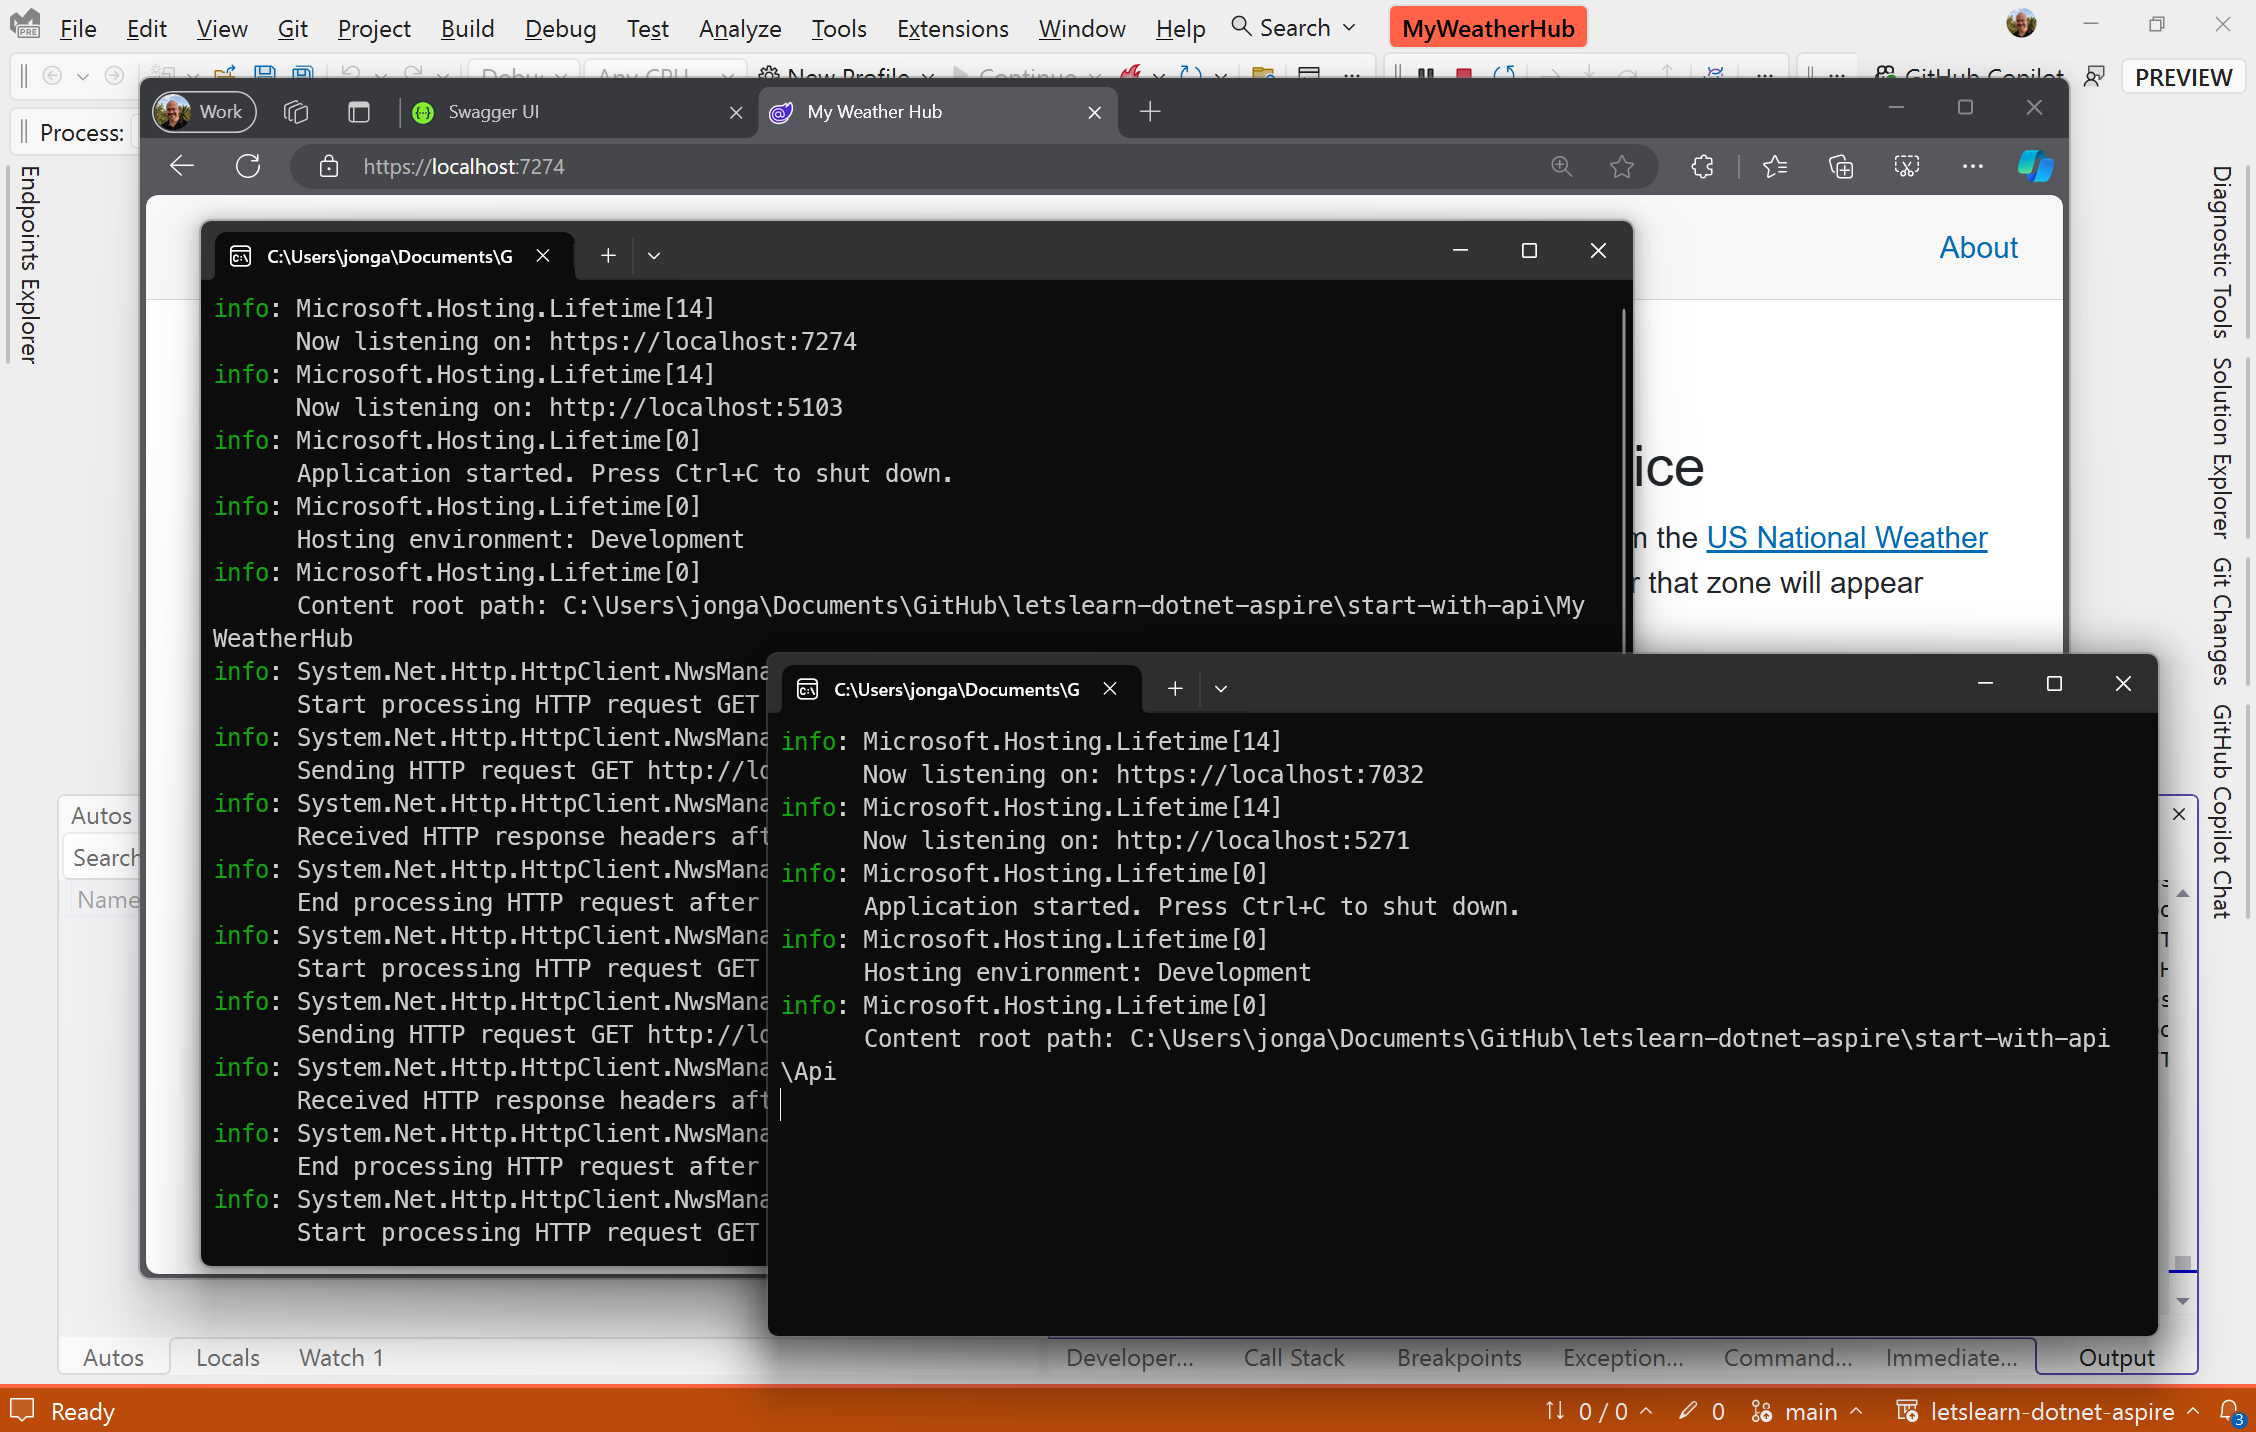
您还可以通过导航到 https://localhost:7274/health 来查看 MyWeatherHub 的运行状况检查。 - View the logs in the terminal to see the health checks and other telemetry data such as resiliency with Polly:
在终端中查看日志,查看运行状况检查和其他遥测数据,例如使用 Polly 的复原能力:Polly: Information: Execution attempt. Source: '-standard//Standard-Retry', Operation Key: '', Result: '200', Handled: 'False', Attempt: '0', Execution Time: '13.0649' - Click on 5 different cities and a “random” error will be thrown. You will see the Polly retry policy in action.
点击 5 个不同的城市,将抛出“随机”错误。您将看到 Polly 重试策略在起作用。Polly: Warning: Execution attempt. Source: '-standard//Standard-Retry', Operation Key: '', Result: '500', Handled: 'True', Attempt: '0', Execution Time: '9732.8258' Polly: Warning: Resilience event occurred. EventName: 'OnRetry', Source: '-standard//Standard-Retry', Operation Key: '', Result: '500' System.Net.Http.HttpClient.NwsManager.ClientHandler: Information: Sending HTTP request GET http://localhost:5271/forecast/AKZ318
And that all works… the output for each application pops up in a separate console window, and we can see the health checks and logs in the terminal. So, it’s great that we’ve got all these features turned on, but it’s a bit of a pain to manage all these URLs, browser tabs, and console windows. You end up alt-tabbing between them all, and it’s a really disjointed experience.
这一切都有效......每个应用程序的输出都会在单独的控制台窗口中弹出,我们可以在终端中看到运行状况检查和日志。因此,我们启用了所有这些功能真是太好了,但是管理所有这些 URL、浏览器选项卡和控制台窗口有点麻烦。你最终会在它们之间切换 alt-tabbing,这是一个非常脱节的体验。
Service Defaults works great on the individual project level, but it doesn’t help us manage multiple projects in a solution. That’s where the AppHost comes in.
Service Defaults 在单个项目级别效果很好,但它不能帮助我们管理解决方案中的多个项目。这就是 AppHost 的用武之地。
Step 2. Simplify launch and add a fancy dashboard with AppHost
第2步。使用 AppHost 简化启动并添加精美的仪表板
Okay, that was pretty cool! We added a project to our solution and two lines of code, and we got health checks, logging, resiliency, and more.
好吧,这很酷!我们在解决方案中添加了一个项目和两行代码,并获得了运行状况检查、日志记录、复原能力等。
But we can make that even better by adding an AppHost. That multiple-project configuration thing works, but it’s a bit annoying to set up and keep updated as we add other projects to the solution. Once we’re running we have to browse to a bunch of urls with different ports and manage each project separately. For instance, if we want to see logs or output, we have to check in each project’s console window. This gets even worse as we add more APIs and services to the solution – more URLs to manage, more console windows to check, etc. We’ve probably got some fancy dashboards and monitoring set up in production, but that doesn’t help me while I’m developing.
但是我们可以通过添加 AppHost 来使其变得更好。这种多项目配置是可行的,但是当我们将其他项目添加到解决方案中时,设置和保持更新有点烦人。一旦我们运行,我们必须浏览到一堆具有不同端口的 url,并分别管理每个项目。例如,如果我们想查看日志或输出,我们必须检查每个项目的控制台窗口。随着我们向解决方案中添加更多 API 和服务,情况变得更糟 - 需要管理更多 URL、需要检查更多控制台窗口等。我们可能在生产环境中设置了一些花哨的仪表板和监控,但这在我开发时对我没有帮助。
The AppHost has a lot of great features, but two of my favorite are the solutions to the problems above: it simplifies project launch and it adds an amazing dashboard to monitor and manage my app in my development environment. The best way to understand what it’s doing it to just add it to our solution.
AppHost有很多很棒的功能,但我最喜欢的两个是上述问题的解决方案:它简化了项目启动,并添加了一个出色的仪表板,用于在我的开发环境中监视和管理我的应用程序。了解它正在做什么的最佳方法就是将其添加到我们的解决方案中。
Adding an AppHost project
添加 AppHost 项目
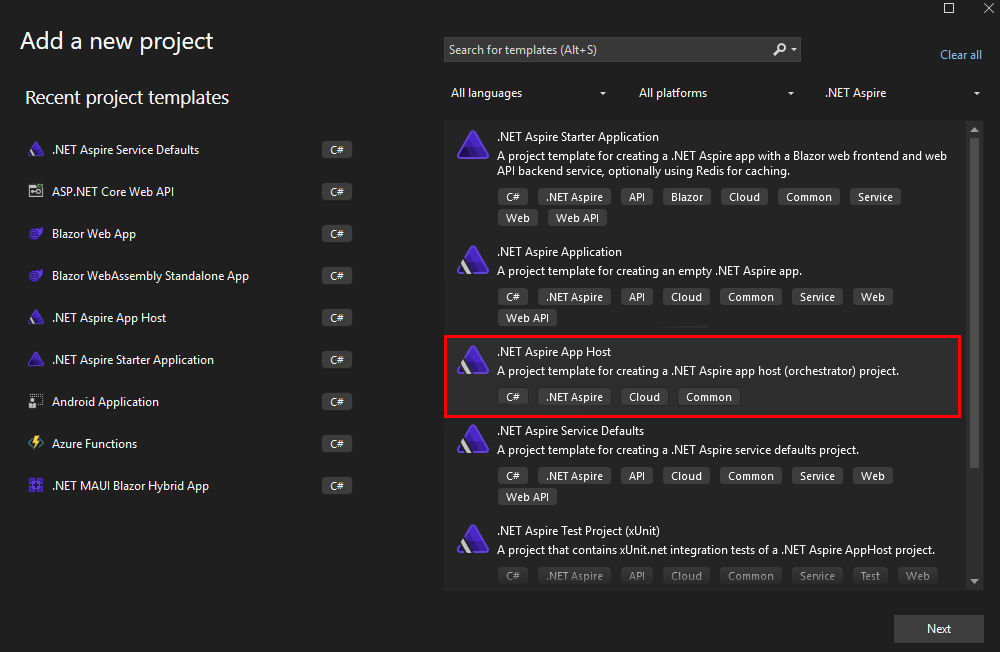
This is the standard “add project” steps we ran through before with ServiceDefaults, but this time we’re going to pick “.NET Aspire App Host” as the project template. In Visual Studio 2022 or Visual Studio Code with the C# DevKit installed:
这是我们之前使用 ServiceDefaults 运行的标准“添加项目”步骤,但这次我们将选择“.NET Aspire App Host”作为项目模板。在安装了 C# DevKit 的 Visual Studio 2022 或 Visual Studio Code 中:
- Right-click on the solution and select Add > New Project.
右键单击解决方案,然后选择“添加>新项目”。 - Select the .NET Aspire App Host project template.
选择“.NET Aspire App Host”项目模板。 - Name the project AppHost (again, any name would work).
将项目命名为 AppHost(同样,任何名称都可以)。 - Click Next > Create. 单击“下一步”>“创建”。
And from the command-line, you can do that with:
在命令行中,您可以使用以下命令执行此操作:
dotnet new aspire-apphost -n AppHostJust like when we added the Service Defaults, we need to add project references and a few lines of code to put the AppHost to work.
就像我们添加服务默认值时一样,我们需要添加项目引用和几行代码来使 AppHost 正常工作。
Add project references 添加项目引用
Add a reference to the Api and MyWeatherHub projects in the new AppHost project:
在新的 AppHost 项目中添加对 Api 和 MyWeatherHub 项目的引用:
- Right-click on the AppHost project and select Add > Reference.
右键单击 AppHost 项目,然后选择“添加>引用”。 - Check the Api and MyWeatherHub projects and click OK.
检查 Api 和 MyWeatherHub 项目,然后单击“确定”。
Note: Bonus points if you remembered the earlier tip that you can drag and drop the project onto another project to add a reference.
注意:如果您记得之前的提示,您可以将项目拖放到另一个项目以添加引用,则可以加分。
When these references are added Source Generators automatically generate the necessary code to reference the projects in the App Host.
添加这些引用后,源生成器会自动生成必要的代码来引用 App Host 中的项目。
Orchestrate the Application
编排应用程序
In the AppHost project, update the Program.cs file, adding the following line immediately after the var builder = DistributedApplication.CreateBuilder(args); line:
在 AppHost 项目中,更新 Program.cs 文件,在 var builder = DistributedApplication.CreateBuilder(args) 之后立即添加以下行;线:
 var api = builder.AddProject<Projects.Api>("api");
 var web = builder.AddProject<Projects.MyWeatherHub>("myweatherhub");
Run the application… the easy way!
运行应用程序...简单的方法!
Previously, we set up a multi-project launch profile. That still works, but from now on, you won’t have to bother with that. Instead, set the AppHost project as the startup project. It knows about all the other projects, and will launch them all automatically. That means that if you add an AppHost at the beginning (or use either the .NET Aspire Starter Application template or the .NET Aspire Application template), you never need to set up a multi-project launch profile again. And even better, if you add more services to your solution, the AppHost will automatically pick them up, too.
以前,我们设置了多项目启动配置文件。这仍然有效,但从现在开始,您不必为此烦恼。而是将 AppHost 项目设置为启动项目。它了解所有其他项目,并会自动启动它们。这意味着,如果在开始时添加 AppHost(或使用 .NET Aspire Starter Application 模板或 .NET Aspire Application 模板),则永远不需要再次设置多项目启动配置文件。更好的是,如果您向解决方案添加更多服务,AppHost 也会自动选择它们。
In Visual Studio, you can set the AppHost project as the startup project in Visual Studio by right clicking on the AppHost and clicking Set Default Project and hitting Start.
在 Visual Studio 中,可以通过右键单击 AppHost,然后单击“设置默认项目”并点击“开始”,将 AppHost 项目设置为 Visual Studio 中的启动项目。
If you’re using Visual Studio Code, replace the contents of your launch.json file with the following and then hitting Run in the Run and Debug panel.
如果您使用的是 Visual Studio Code,请将launch.json文件的内容替换为以下内容,然后在“运行和调试”面板中点击“运行”。
 {
        "version": "0.2.0",
        "configurations": [
            {
                "name": "Run AppHost",
                "type": "dotnet",
                "request": "launch",
                "projectPath": "${workspaceFolder}\\AppHost\\AppHost.csproj"
            }
        ]
    }
Hey, we’ve got a dashboard!
嘿,我们有一个仪表板!
Remember how we had to browse to a bunch of different URLs to see our app and its health checks? Now, the AppHost will automatically launch a dashboard with all our services and their dependencies. It rolls up all the health checks, traces, logs, and information like environment variables in one place. And, if we add more services to our solution, they’ll automatically show up in the dashboard. Let’s take a look.
还记得我们是如何浏览到一堆不同的 URL 才能查看我们的应用程序及其运行状况检查的吗?现在,AppHost 将自动启动一个包含我们所有服务及其依赖项的仪表板。它将所有运行状况检查、跟踪、日志和环境变量等信息汇总到一个地方。而且,如果我们向解决方案中添加更多服务,它们将自动显示在仪表板中。让我们来看看。
First, let’s take a look at the resources. This is a handy listing of all the resources in our solution. We can see the API and MyWeatherHub projects and watch their state as they start up. We also get clickable links to their endpoints, logs, and traces.
首先,让我们看一下资源。这是我们解决方案中所有资源的便捷列表。我们可以看到 API 和 MyWeatherHub 项目,并在它们启动时观察它们的状态。我们还获得了指向其端点、日志和跟踪的可点击链接。
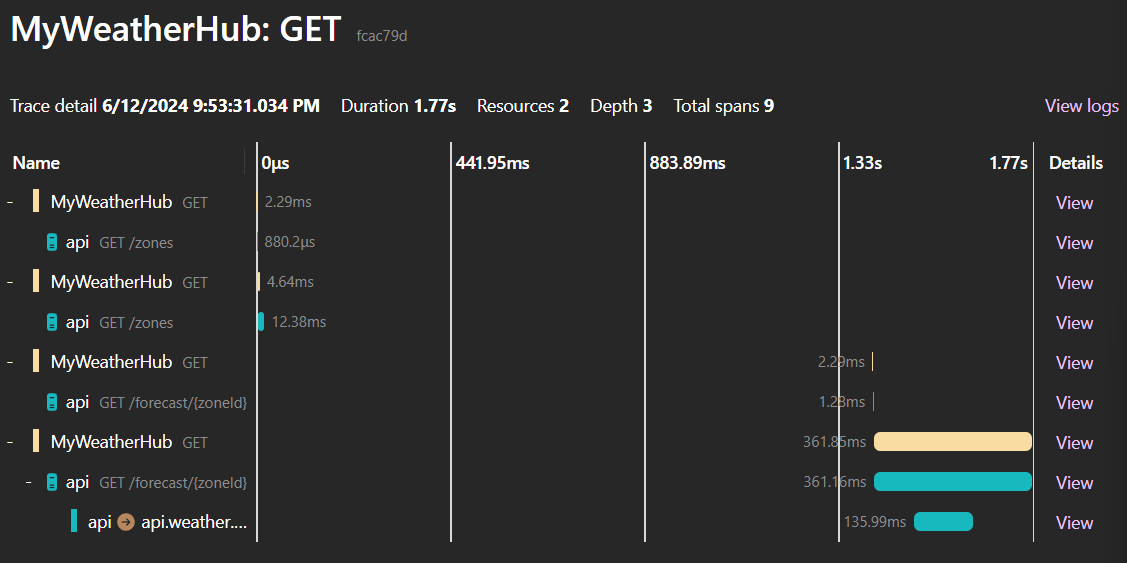
The ServiceDefaults project we added earlier automatically configures tracing for all of our projects. We can see that in the Traces tab. This is a great way to understanding timing and dependencies in our app.
我们之前添加的 ServiceDefaults 项目会自动为所有项目配置跟踪。我们可以在 Traces 选项卡中看到这一点。这是了解我们应用程序中的计时和依赖关系的好方法。
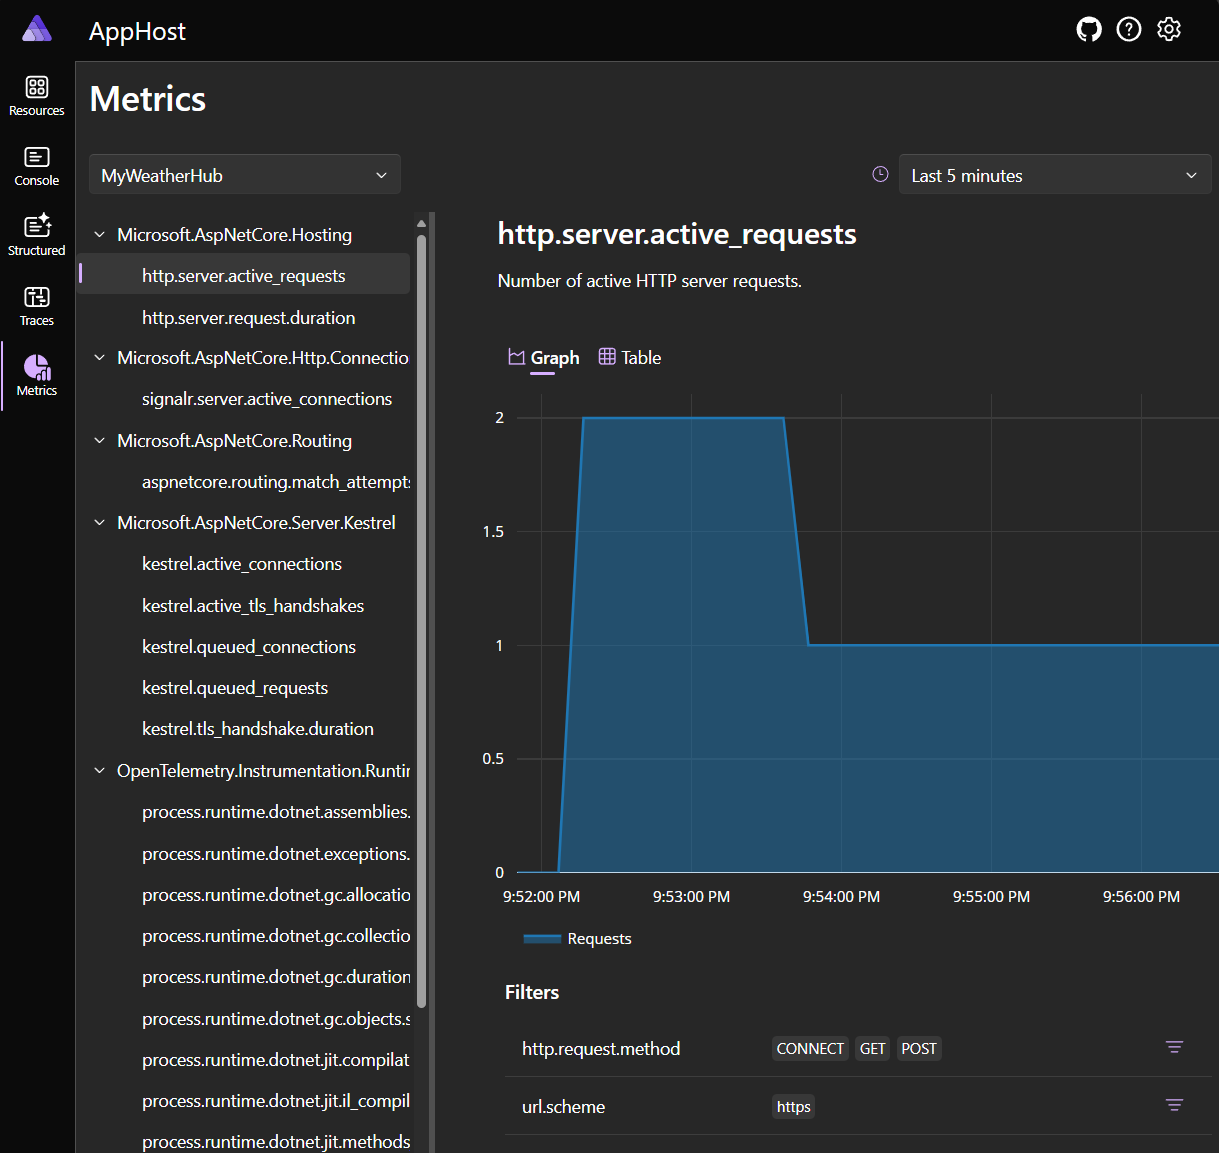
The Metrics tab shows us a lot of information about our app, including CPU and memory usage, and the number of requests and errors. Again, this is all automatically set up for us by the ServiceDefaults project and exposed in the AppHost dashboard.
“指标”选项卡向我们展示了有关应用程序的大量信息,包括 CPU 和内存使用情况,以及请求和错误的数量。同样,这一切都是由 ServiceDefaults 项目自动为我们设置的,并在 AppHost 仪表板中公开。
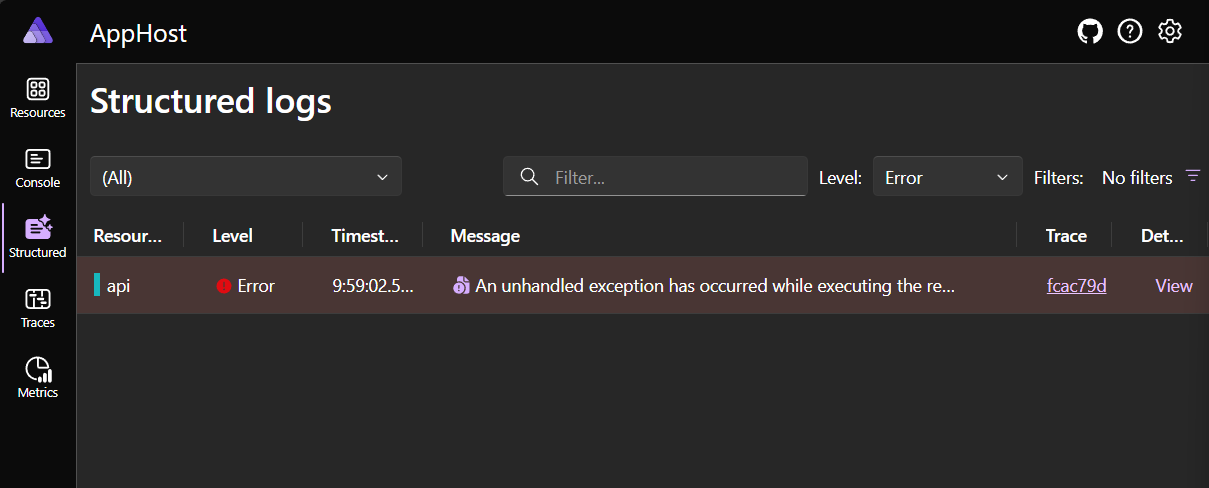
The Structured tab shows us all the structured logs from our app. This is a great way to see errors and other important information in our app.
“结构化”选项卡向我们展示了我们应用程序中的所有结构化日志。这是在我们的应用程序中查看错误和其他重要信息的好方法。
Summary 总结
The point is, .NET Aspire isn’t just for new apps or giant enterprise solutions. It’s for you, right now, to make your existing apps better. You can add it to your existing solutions and get a lot of benefits with just a few lines of code. And, if you’re not ready to use more advanced features like service discovery or containerized deployment, that’s okay. You can still benefit from the simplicity and reliability that .NET Aspire brings to your apps.
关键是,.NET Aspire 不仅适用于新应用或大型企业解决方案。现在,你要做的就是让现有的应用程序变得更好。您可以将其添加到现有的解决方案中,只需几行代码即可获得很多好处。而且,如果您还没有准备好使用更高级的功能,例如服务发现或容器化部署,那也没关系。您仍然可以从 .NET Aspire 为您的应用带来的简单性和可靠性中受益。

 Light
Light Dark
Dark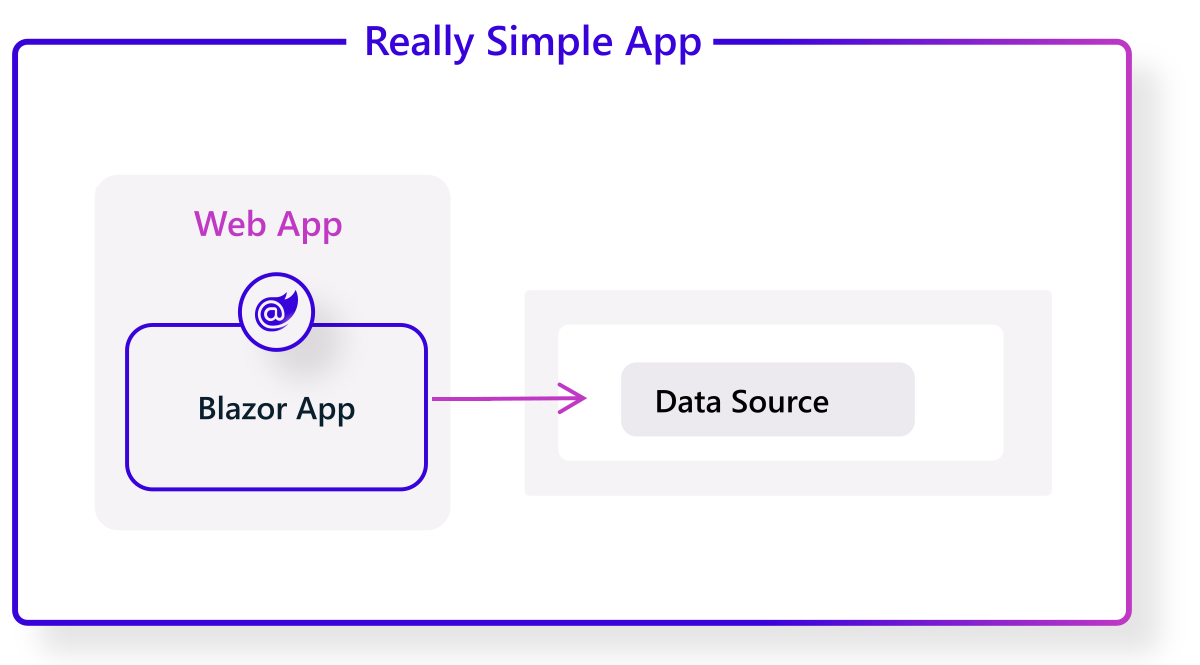



5 comments
Thanks for the comprehensive description of Aspire.
The more I read about Aspire, the more I think it is NOT for me.
I only create WPF applications.
So far I have not seen anything that makes me think that Aspire can be used in a desktop application. (WPF, WinForms, or even MAUI)
I might be wrong, but I have just not found an...
Read more
Hi Jon,
Thanks a bunch for such a great article.
For: Configure Service Defaults => Add a reference to the ServiceDefaults project in the Api and MyWeatherHub projects:
It should be
3. Right-click on the
Api=> MyWeatherHub project and select Add > Refere...Read more
Great catch, thanks! Fixed.
The Aspire Dashboard is great, at my company we use it during development and staging… but without any k8s and docker imaging… just the plain app. It’s a single app, that either runs as a service, a standalone console app (–console) or as an aspire host (–aspire) that just pretends to be an aspire project/host and spawns itself again as the act...
Read more
That’s great! Exactly the thinking behind putting this blog post together – you can use individual features in .NET Aspire, like the dashboard, to simplify your dev / stage process. Great to hear it!
If you have an existing deployment technology (like Terraform), you should of course continue to use it. While it’s technically possible to...
Read more